This course will require the following versions of the libraries
We recommend all students to use the scholar cluster (details below). You should already have access.
The use of a personal machine is allowed but not required (we will provide GPU access through the Scholar cluster). Make sure it meets the following specifications:
The programming language used in this course is Python 3. The code shown in lectures, and the homeworks, are expected to run in an up-to-date version of Python (we highly recommend Python 3.6+).
Python tutorials
Here we will describe some resources available to work on Python and deep learning assignments.
Tip:
You can check the version of the Python you are running with the following code:
$ python3
>>> import platform
>>> platform.python_version()
Python @ personal computer: You can install python using the anaconda (Free) bundle on your personal computer. We recommend the Python 3.11 version. This requires about 1GB of free disk space. After installing anaconda, you can use Anaconda Navigator to start a Jupyter notebook or the Spyder IDE (Editor). Alternatively, you can also install another editor, such as Visual Studio Code (Free). Make sure you can install pytorch 2.1.2+. Pytorch needs about another 1GB of free disk space.
Python @ Scholar Cluster: The Scholar Cluster, operated by ITaP/RCAC is available to (and shared by) multiple courses across the campus. As a batch resource, the cluster has access to typical high performance computing (HPC) software packages and tool chains; as an interactive resource, Scholar provides a Linux remote desktop and a Jupyter notebook server.
Because most students will not have access to a high-end Nvidia GPU with Tensorcores, we recommend the use of the Scholar cluster.
Some assignment might require the usage of the Scholar cluster. Python code is quite portable with rare portability issues. However, for added precaution, make sure your code can run on the cluster. All enrolled students should have access to the Scholar cluster using their Purdue login. If you don't have access to the cluster, contact your instructor.
You need to access the cluster via terminal, through SSH at scholar.rcac.purdue.edu. This will connect you to one of the available front-end nodes (e.g. scholar-fe00.rcac.purdue.edu).
You can use the front-end for lightweight jobs or submit longer (or resource intensive) jobs to be executed on the back-end nodes.
ssh (username)@scholar.rcac.purdue.edu

The authenticity of host 'scholar.rcac.purdue.edu (128.211.149.170)' cant be established.
ED25519 key fingerprint is SHA256:2C5i5KiXuA+Zzaq6jdtyGU7D2/RrzO3yZM7XXFQcs4s.
Are you sure you want to continue connecting (yes/no)? yes
Warning: Permanently added 'scholar.rcac.purdue.edu,128.211.149.170' (ED25519) to the list of known hosts.

************************************************************

***** Use of Purdue BoilerKey or SSH keys is Required ******

************************************************************

Password: (PIN),(BOILER KEY)
Upon login, see which job queues you have access to (it should look like this):
$qlist

                      Current Number of Cores                       Node
Account           Total    Queue     Run    Free    Max Walltime    Type
==============  =================================  ==============  ======
debug                20        0       0      20        00:30:00     A,G
gpu                  64        0       0      64        04:00:00       G
long                100        0       0     100      3-00:00:00       A
scholar             424        3       0     424        04:00:00     A,G
DO NOT RUN YOUR ASSIGMENTS ON THE FRONT ENDS FROM THE TERMINAL--- the process will be killed and you might be kicked out of the cluster. We will cover how to submit jobs.
Some of the front-end nodes also have GPUs available.
TIP: At the time of writing, this were the front-end nodes with GPUs available:
- scholar-fe04.rcac.purdue.edu
- scholar-fe05.rcac.purdue.edu
- scholar-fe06.rcac.purdue.edu
If needed, you can SSH directly to one of those front-ends. For jobs running on the back-end, you can submit them from any front-end, but if GPU is needed, you must submit to a specific queue. See more information below.
ssh scholar.rcac.purdue.eduIf you are unfamiliar with using a unix shell and command line commands, RCAC has workshops, and the slides/tutorials are available online. They also have a list of recommended/maintained tools (including SSH tools for windows).
SSH is usually already available on linux and Mac machines. For Windows, an external program might be needed. Besides the link provided above, check also the resources provided by the CS department.
There are [comprehensive help guides][rcac-help] as well as a [quick reference card][rcac-reference] available from ITaP.
If more help is needed, contact your TA or instructor, before contacting ITaP.
If you don't want to type your Boiler Key every time you access Scholar, you can try the following (only linux and macOS)
On your personal computer terminal, at your home folder (linux and macOS only)
$ mkdir ~/.ssh
$ ssh-keygen -t rsa
$ ssh-copy-id -i ~/.ssh/id_rsa (username)@scholar.rcac.purdue.edu
Now when you ssh from this personal computer, you will not be asked the Boiler Key if you use
$ ssh -i ~/.ssh/id_rsa (username)@scholar.rcac.purdue.edu
How to get started:
You first need to make sure you are at a frontend machine with a GPU.
$ ssh scholar.rcac.purdue.edu
Now we can load the modules we need to install our packages.
$ module load anaconda/2024.02-py311

$ conda create -n CS373 python=3.11 ipython ipykernel

...

The following NEW packages will be INSTALLED:

...

Proceed ([y]/n)? y (ENTER)
$ source activate CS373
$ conda install matplotlib scikit-learn

...

The following NEW packages will be INSTALLED:

...

Proceed ([y]/n)? y
Make sure you had run "source activate CS373" before running the next line
$ pip3 install torch torchvision torchaudio --index-url https://download.pytorch.org/whl/cu121

...

The following NEW packages will be INSTALLED:

...

Proceed ([y]/n)? y (ENTER)
IMPORTANT: If you have any issuing installing conda packages (specially pytorch), you can always run conda clean --all an restart the tutorial
We will now add this environment to Jupyter notebooks
$ ipython kernel install --user --name CS373 --display-name "Python [CS373]"
Installed kernelspec pytorch in /home/(your account)/.local/share/jupyter/kernels/CS373
The above Python kernel provides python packages commonly used in data science, such as: numpy, scipy, scikit-learn, and matplotlib.
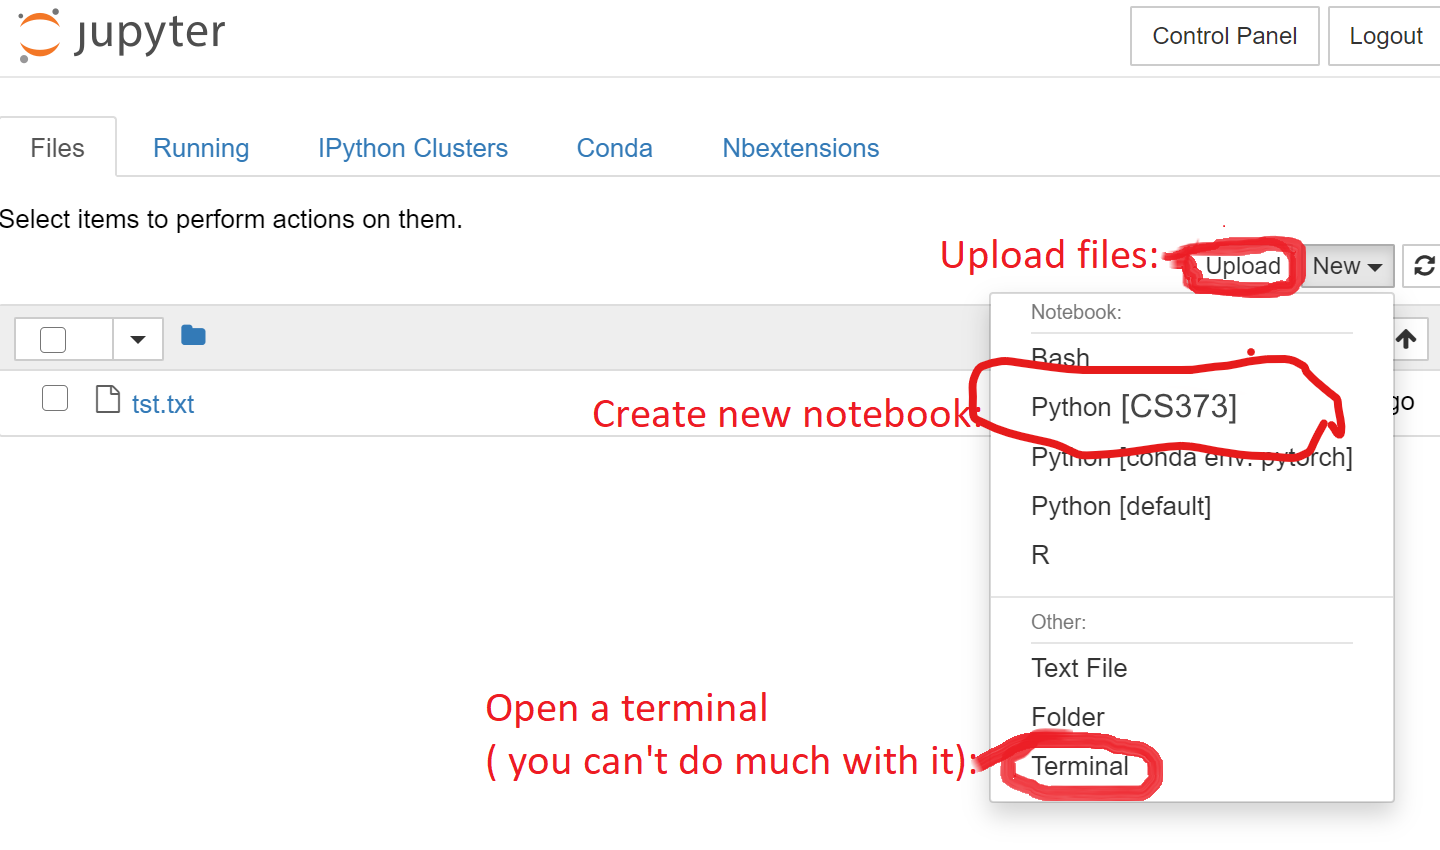
TIP: Transfering files
While you can transmit files from your computer to the cluster using the Jupyter Hub interface (see screenshot above), there are tools which can make it easier to transfer multiple files:
scporrsynccommand line tools for Linux/Mac- WinSCP for windows (GUI)
- Other GUI tools recommended by RCAC for Windows/Mac
The cluster is composed of several linux machines. When you connect to the cluster (either through [SSH][ssh-tools] or through a web interface), you are connected to a “Front-End” machine. This machine is shared by everyone using the cluster and should only be used for quick/small jobs which do not consume many resources. For long-running and/or more resource intensive jobs, you should submit a batch job (see below).
For longer running jobs or jobs that require more resources (multiple nodes/cpu), you can submit jobs to be processed on the back-end, which has more than 400 cores available. The cluster is managed by the SLRUM software, that receives jobs from the users and allocates them to the available resources. The process of submitting a job to the cluster involves two steps: creating a job submission file, and submitting it to the SLURM queue.
We'll give a simple description of the submission process, but if more information is needed, check also the Scholar User Guide on Running Jobs and the FAQ.
You can find a lot of job submission examples at Scholar's Job Examples
For this example, we'll run the following python code on the cluster. Save it with the name my_code.py in your home folder.
# Has to include the following two lines before loading matplotlib
# for plots to work when running in the cluster
from matplotlib import use
use('Agg')
import matplotlib.pyplot as plt

from sklearn.datasets import load_iris

data = load_iris()
X, y = data.data, data.target

# Plot the petal dimensions as a scatterplot
for value, name in enumerate(data.target_names):
    # Select only the examples of this class
    rows = (y == value)

    # Plot them using the petal measurements
    plt.scatter(X[rows, 2], X[rows, 3], label=name)

# Finish plot by adding axis labels and title, very important!
plt.title("Petal measurements for flowers in the Iris dataset")
plt.xlabel(data.feature_names[2])
plt.ylabel(data.feature_names[3])
plt.legend()

# Save plot as a PNG file
plt.savefig("iris.png")
The submission file is a simple textfile that has a list of commands specifying the job requirements, followed by a list of shell commands to run.
Once the cluster starts your job, it will execute the commands from this file. As soon as this terminates, your job is finished.
Save the following content as the file my_job_submission_file in your home folder.
Without GPU access:
#!/bin/bash
#SBATCH --nodes=1
#SBATCH --cpus-per-task=4
#SBATCH --time=30:00
#SBATCH --job-name TestCPU
#SBATCH --output TestCPU.out
#SBATCH --error TestCPU.err

# Run python file.

# Load our conda environment
module load anaconda/2024.02-py311
source activate CS373

# Run my code
python3 ~/my_code.py
With GPU access:
#!/bin/bash
#SBATCH -A gpu
#SBATCH --nodes=1
#SBATCH --gres=gpu:1
#SBATCH --cpus-per-task=4
#SBATCH --time=30:00
#SBATCH --job-name TestGPU
#SBATCH --output TestGPU.out
#SBATCH --error TestGPU.err

# Run python file.

# Load our conda environment
module load anaconda/2024.02-py311
source activate CS373

# Run my code
python3 ~/my_code.py
NOTE (advanced): If you execute commands that run asynchronously (e.g. run in the background), if your submission file finishes executing before your background code is finished, the cluster will consider your job finished an will terminate (kill) any remaining background process.
You can use scancel command to control your jobs. Here attached are the commonly used scancel command examples.
To cancel one job:
$ scancel <jobid>
To cancel all the jobs for a user:
$ scancel -u <username>
To cancel all the pending jobs for a user:
$ scancel -t PENDING -u <username>
To cancel one or more jobs by name:
$ scancel --name myJobName
For more use
Now that you have both my_code.py and my_job_submission_file in your home folder, SSH to the front-end:
$ ssh username@scholar.rcac.purdue.edu
And submit your job:
$ sbatch ./my_job_submission_file
With this command, your job will enter the queue and will be executed when the resources are made available to it.
You can check the status of your jobs with the command squeue:
$ squeue -u username
INFO:
If your job writes to the standard output and standard error, you can find such output in the filesjob-name-XXXXX.out, wherejob-nameis the name you gave to the job andXXXXXXis the numerical ID of the job.
There are multiple queues in the scholar cluster. The main difference between them is the type of node available (with or without GPU) and the maximum time allowed for a job (up to 4 hours or 72 hours).
If you need to run longer jobs (between 4 and 72 hours), use the long queue. If you need to use GPUs, use the gpu queue. It is important to select the correct queue as they have different number of nodes available and your job may take longer to run depending on the queue (for example, the debug queue might take less time to start your job, but it only allows one job for up to 30 minutes).
To see the status of the queues, you can use the qlist command:
$ qlist
In the submission file, the first few lines prefixed by #SLURM are directives that specify options for the submission. In the example given above, we specify which queue to use (-A scholar), how many nodes and cores per node we need, how much time we need --time=1:30:00 and we also give a name to our job (--job-name example-job), to make it easier to recognize it (e.g. when looking at the output of squeue).
You can also pass these options in the command line.
You can find more information about running a job and the available options in the user guide and the FAQ.
Sometimes, when developing code, it is useful to have access to the same environment where the code will be run when the job is submitted. For this purpose, you can request an interactive job:
sinteractive -A myqueuename
When running this command, your terminal will block until the cluster allocate the requested resources to you. Then, it will redirect you to an interactive shell inside of the back-end node allocated for you.
More information can be found in the user guide.
You can also try free GPU using Jupyter notebooks in Google Colab, allowing code to be run and edited live in the cloud.
Getting Started
Opening Jupyter Notebook:
For some assignements, you need to submit your code (and possibly other files) using turnin.
This software is available from the Linux machines in the CS department only.
We recommend you to use data.cs.purdue.edu to submit your files.
An example submission goes as follows:
Connect to data.cs.purdue.edu via ssh (if you have a Windows computer, you can use PuTTy or other client of your choice):
ssh username@data.cs.purdue.edu
Replace username with your username.
Put all your files inside a single folder
turnin -v -c cs373 -p project-name folder-name
Replace project-name with the name given in the assignment (e.g. homework-1 or ca-). Replace folder-name with name of the folder you are submitting (usually is the same as the project name).
Make sure you are running the command from the same folder that has the folder-name folder. For example, if the files are organized like this:
/homes/username/homework-1/
/homes/username/homework-1/q0.txt
/homes/username/homework-1/q1.py
/homes/username/homework-1/q2.py
/homes/username/homework-1/q3.py
Then you should run the command from the folder /homes/username/. You can use the command pwd to print your current directory , cd folder-name to enter the folder folder-name and cd .. to go up one folder.
When you run the turnin command, it will output a list of the files submitted. Double check that all necessary files were submitted.
For example above, you would see an output similar to this:
$ turnin -v -c cs373 -p homework-1 homework-1
drwxrwsr-x username/username 0 2019-08-19 10:42 homework-1/
-rw-rw-r-- username/username 6 2019-08-19 10:42 homework-1/q0.txt
-rw-rw-r-- username/username 6 2019-08-19 10:42 homework-1/q1.py
-rw-rw-r-- username/username 6 2019-08-19 10:42 homework-1/q2.py
-rw-rw-r-- username/username 6 2019-08-19 10:42 homework-1/q3.py
Your files have been submitted to cs373, test for grading.