Project 0: Getting VTK... to Work
A prerequisite to any actual visualization work in this class is to install VTK on your local machine and ensure that it works properly. VTK is an open source library written in C++ that has been successfully tested on all sorts of platforms and most operating systems. In particular, Windows, Mac OSX, and Linux are all extremely well supported. A fair amount of documentation designed to help users and potential developers is available in the VTK Wiki. The instructions below can mostly be found in the Building VTK rubric.
Prerequisites
To install VTK according to the instructions below you must first ensure that you have a C++ compiler installed on your machine. If you are using a Windows computer, you will need Visual Studio, which you can obtain for free from ITaP. If you are using a Linux machine, you should not have to do anything since compilers are usually part of the standard installation. Finally, if you are using a Mac, you will need to install the developer SDK on your machine if you have not done so already.
If you are using OSX you will need some software that is only available through the Apple Developer Program. If you do not have an account in this program yet, you can create a free one here. If you have OSX 10.7 and up, the first step is to download XCode 4.5.2. Note that you can either download it from the Apple Developer site or from the App Store. Once the installation of XCode 4.5.2 is completed you will need to download the command line tools that CMake needs. Those are available on the Apple Developer site by clicking “View all downloads” (at the bottom of the page) and selecting “Command Line Tools for XCode” (there is a version of OSX Lion and OSX Mountain Lion). This will install all the compilers and standard libraries needed to compile VTK.
If your machine runs Snow Leopard (OSX 10.6) or a prior version of OSX, you will need an older version (XCode 3 or less). You can download this software under from the Apple Developer site by clicking on “View all downloads” and searching for “XCode 3” in the next page. Pick the version that matches your OS. Note that the older version of XCode do install all the command line compilers that you need with CMake. Hence installing XCode is all you have to do.
Getting VTK
There are two ways to acquire the source code of VTK. Use the first solution (below) unless you are an experienced programmer and plan to keep working with VTK beyond this class.
-
1. Download the latest stable source release
By far the simplest option to obtain the source code of VTK consists in downloading the most recent stable release. At present, the latest release is 5.10.1. Corresponding instructions are available here.
-
2. Obtain VTK using Git
Git is a distributed version control system that the developers of VTK use to collaboratively extend the software. Using Git you can access the latest version of VTK and keep your local copy up to date as modifications are being made over time. The corresponding procedure is described here. In particular, you should first install Git (if you do not have it already) and then download VTK using it. Note that this approach will provide you with VTK 6. This version has no stable release to date and has some incompatibilities with the pipeline structure of VTK 5.
Since you downloaded the C++ source code of VTK, the next step is now to compile (build) the software. While this may seem daunting to those of you who have never done so before, VTK makes this step (somewhat) easy by making use of CMake.
Getting VTKData
The examples that come with VTK make use of a number of interesting datasets that you should download as well. This will help you familiarize yourself with the syntax of typical VTK programs by running the examples and see what they do. The latest version of the data is available here. Download it and unpack it to a convenient location.
You then need to set an environment variable named VTK_DATA_ROOT to the path of VTKData. The procedure to set an environment variable in Windows varies depending on the version of Windows that you have. This is explained here.
Under Linux or OSX you can define an environment variable in the current shell by typing
setenv VARIABLE value
if you are using csh (or tcsh). If you want that variable to be set globally, you need to add that declaration to the .cshrc (or .tcshrc) file in your home directory. If you are using bash, the correct syntax is
export VARIABLE=value
and that line should be added to .bashrc to make the change global.
Getting CMake
CMake is an open source cross-platform build system. You can download a version of CMake compatible with your operating system here. Note that CMake can either be installed from source or downloaded directly in executable format. I strongly suggest that you choose the latter option and download the most recent binary distribution of CMake (available for Windows, OSX 32, OSX 64, Linux i386) unless you have experience with this type of installation. If you choose to install CMake yourself, instructions are provided here.
Building VTK with CMake
Now that you have installed a compiler, downloaded the VTK source code, and installed CMake, you have assembled all the pieces necessary to build VTK. The instructions do so on Windows, Linux, and Mac are provided here.
If you are using a Windows machine, refer to the corresponding instructions and note that Visual Studio will be necessary. In the following I assume that you have chosen the same directory location as the one below for your installation.
If you have a Linux machine or a Mac, the instructions are fundamentally identical (you simply need to use Terminal under Mac). Assuming that you have installed the VTK source under directory <DIR>(*) (say “~yourname/code/VTK”), the steps are as follows.
mkdir <DIR>/build
cd <DIR>/build
ccmake ..
Under CMake, you will initially find an empty cache. Initialize the cache by typing ‘c’ (for configure). This may take a little while depending on your machine. At this stage, CMake is looking through your computer to determine what it is and what programs and libraries you have installed. Once CMake has completed this initial inspection, its various parameters are assigned (sensible) default values. Some need to be modified, though.
Make sure to select BUILD_EXAMPLES and BUILD_SHARED_LIBS (type return to toggle between ON and OFF) and replace Debug by Release under CMAKE_BUILD_TYPE (typing return once activates the edit mode, typing it again exits the edit mode). Regardless of the language that you plan to use with VTK you should activate VTK_WRAP_PYTHON and VTK_WRAP_TCL. They will be helpful to run examples. VTK_WRAP_JAVA is optional and will only be useful if you use Java as your programming language. Under VTK_DATA_ROOT you should see the location at which you installed VTKData (which CMake picked up from the environment variable). If you have QT installed on your machine, you may select VTK_USE_QT. On a Mac, you should make sure that VTK_USE_COCOA is selected and VTK_USE_CARBON is not. Once this is done type ‘c’ again. If your selection caused additional parameters to be automatically set by CMake, those will appear preceded by an asterisk. Type ‘c’ one last time to rerun the configuration with those parameters. For what it is worth, here are two screen shots of the configurations that I obtained with VTK 5.10.1 under OSX 10.7 (left) and under Linux (right). Click on them for full size images.


If the reconfiguration was successful, you should now see “Press [g] to generate and exit” at the bottom of your window. Type ‘g’. CMake should exit after having generated a Makefile. Once back to the shell, simply type
make
(and wait). It may take a really long time (in the ballpark of an hour) if your machine is slow. If you have a parallel processor (most computers do these days), you can speed up the build process by running make in parallel through
make -j <N>
where <N> is the number of threads available on your machine. On a laptop, 2 or 4 are likely numbers while on a desktop computer you should have between 8 and 16 threads. Note that threads and cores are different things and that hyperthreading allows a machine with n cores to run 2 x n threads (e.g., a quadcore machine can run 8 threads in parallel).
Making Sure that Things Work
If the build completed successfully, you should now have produced two executables named vtk and vtkpython. If you compiled VTK under Windows, the executables are located under <DIR>/build/bin/release. Under OSX or Linux the executables will be under <DIR>/build/bin. In the following, I refer to the location of these executables as <EXECDIR>.
The easiest way to verify that things work as they should is now to try and run some of the VTK examples that come with the source code. These examples are located under <DIR>/Examples. Here are a few examples of what you should be getting.
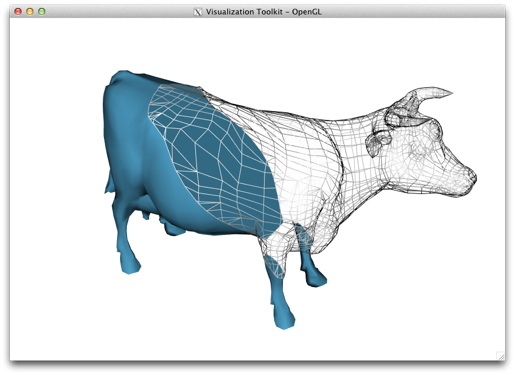
<EXECDIR>/vtkpython <DIR>/Examples/VisualizationAlgorithms/Python/ClipCow.py
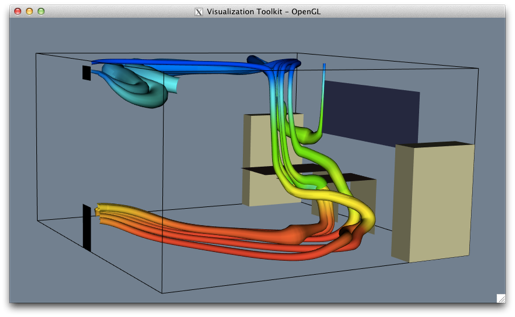
<EXECDIR>/vtkpython <DIR>/Examples/VisualizationAlgorithms/Python/officeTubes.py
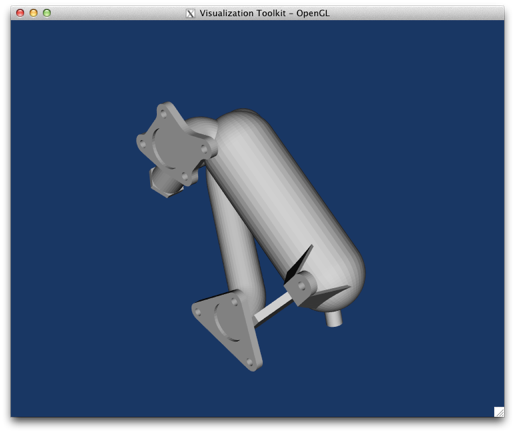
<EXECDIR>/vtkpython <DIR>/Examples/Rendering/Python/CADPart.py
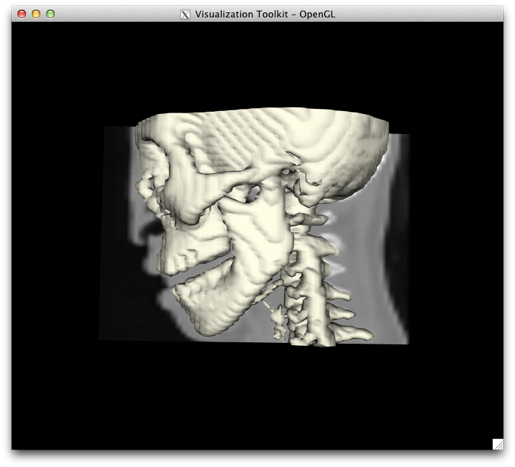
<EXECDIR>/vtkpython <DIR>/Examples/VolumeRendering/Python/VolumePicker.py
If your installation runs these examples correctly, congratulation, you are set! If you encountered any problem along the way, please consult the discussion forum titled “VTK Installation” on Piazza.
(*) Make sure that this directory contains the file CMakeLists.txt.