Project 5: Traffic Simulator
Assigned: Sunday, April 10, 2011
Due: Monday, April 18, 2011 @ 11:59pm
Objective
The objective of this project is to demonstrate concurrency in the context of a GUI and event-driven programming. You should be familiar with all the material from the lectures, recitations, and book readings up to this point. While the code you will write is generally not too complex, you should allow yourself plenty of time to finish the project (more than any prior project) since GUI code and particularly concurrency can be difficult to debug. Start as early as possible and ask questions as they arise.
Setup
Before you begin, you need to create a folder called project5 in your CS180 folder to hold your .java files for this project. Use the terminal to create this folder:
>> pwd
/home/yourlogin/CS180
>> mkdir project5
>> cd project5
Overview
For this project, you will be developing a traffic simulator which simulates cars going in four directions at a traffic light intersection (the cars will not be making turns but only going forwards). You will be responsible for constructing the layout of the GUI and the events associated with each user interaction (you are not responsible for rendering the intersection or the cars). You will also be responsible for designing a car class to represent each car. Each car should be its own thread so as to maintain the ability to control each car individually. Failure to spawn a new thread for each car will result in a severe point deduction.
To get started, download the project's jar file here. This file contains the following classes and interfaces (API):
Project5Constants: this class contains constants which are used in our solution. You should read through what is available here and take advantage of usful consants as you see fit. If you need to see the constants' values, then you can find the java file here (note that you should not hardcode these values in your program, however).
TrafficCanvas: this class contains the canvas in which the simulator is drawn on. To create a car, you need to wite your own car class and associate it with an id given by the TrafficCanvas. You will then use the car's id to operate on the car on the canvas.
TrafficGuiInterface: this interface must be implemented by your GUI class. Implementing this interface allows the TrafficCanvas to grab the necessary information from the GUI during its rendering.
CarAtRedLightException: this exception is thrown when a car is attempted to be moved into the intersection when it has a red light. In this case, the car should remain stopped until its light turns green.
CarOutOfCanvasException: this exception is thrown when a car is moving off the TrafficCanvas. In this case, the car's thread should terminate execution and the car removed from the TrafficCanvas.
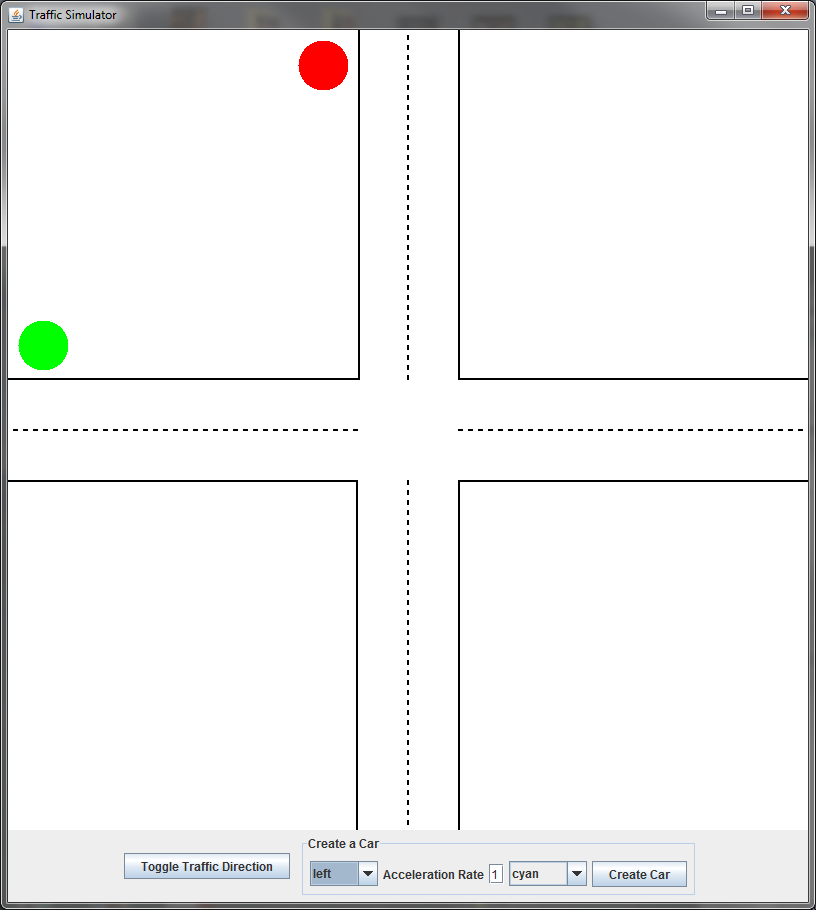
Here's a picture of the simulator that you'll be creating:
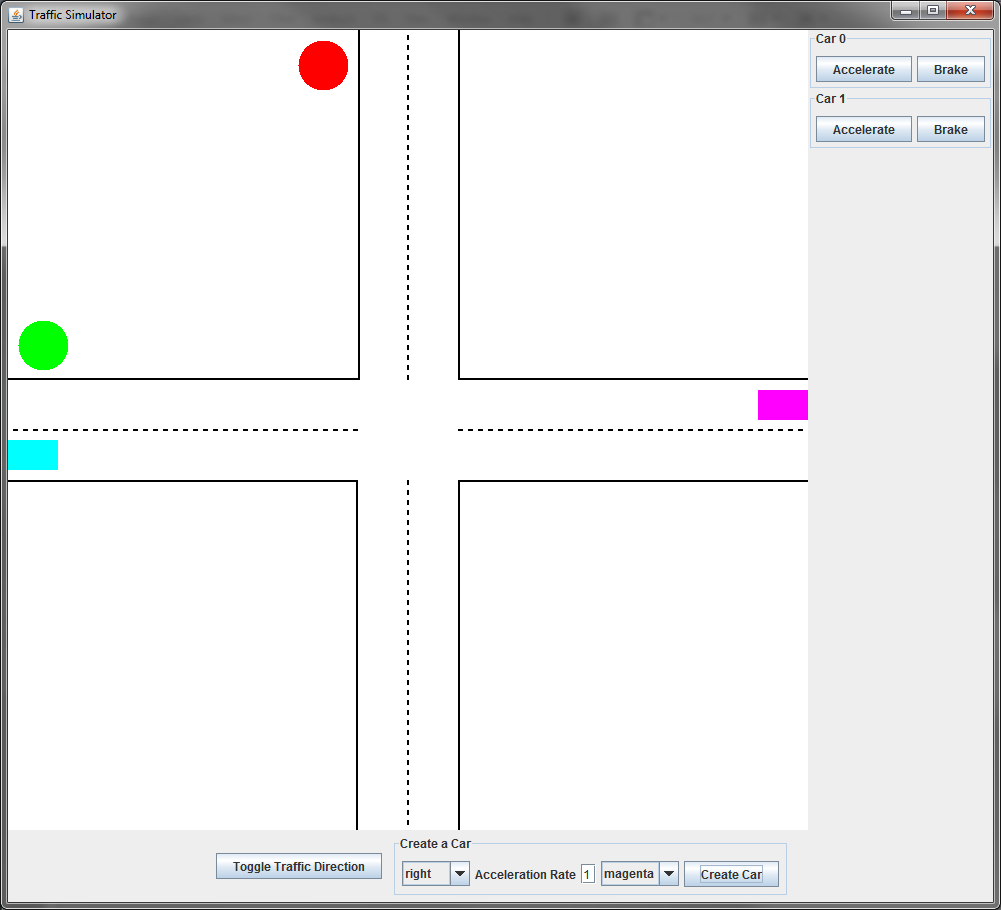
After creating two cars, your simulator would look like the following:
A video (mp4 format) demonstrating the simulator can be found here.
The cars are rectangular and colored one of four selectable colors (cyan, magenta, yellow, or gray as defined in Java's Color class). The traffic light is signified by the two circles, one green and one red. In the image above, the green light indicates that cars can move in the left-right direction. The red light indicates that a car travelling up-down must stop at the intersection. We use a BorderLayout to lay out our GUI components.
If at any time you do not understand how the program is supposed to operate, please ask a TA. Each TA should have a copy of a solution program, and they will be happy to show you the interactions of each component of this project.
Notation
First, lets define with some notation for this project:
Traffic Direction: the traffic direction indicates which of the two orthogonal directions has the green light (in the above example, the green light direction is left-right). If a car has a green light, it should continuously be moving based on the car's current speed, which is a function of its acceleration rate. Once they exit the dimensions of the canvas, the car should be terminated (its thread stopped, its controlling panel removed, and its id removed from the TrafficCanvas). See Project5Constants for the constants LEFT_RIGHT_TRAFFIC and UP_DOWN_TRAFFIC.
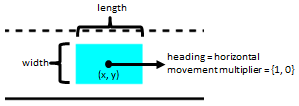
Car Dimensions : a car's position is an (x, y) coordinate pair (where the origin is the upper left corner) indicating the center point of the car. A car also has a heading, which is either horizontal or vertical depending on the direction the car is moving (see Project5Constants for two values, HORIZONTAL_HEADING and VERTICAL_HEADING). The heading is determined by the car's movement multiplier which is a two-dimensional tuple where one value is -1 or 1 and the other is 0 (see Projet5Constants for CAR_MOVE_DIRECTIONS). The non-zero element indicates movement in the +/- x or y direction, thus defining the heading of the car. The car also has a rendering width and height defined in Project5Constants. Finally, a car has a color. See the image below to see the described values for a cyan colored car:
Canvas Dimensions: the simulation is drawn on a TrafficCanvas object (you'll have to register your GUI with this object through its constructor). The canvas itself is defined by constants representing pixel amounts in Project5Constants. The grid size defines the size of the square canvas. The lane width defines the width of a lane in the road (each road has two lanes), and the line width is the thickness of each drawn road element. The dash length represents the length of the center division dashed line for each road. The center of the canvas is thus defined as a square of length 2*LANE_WIDTH centered about (GRID_SIZE/2, GRID_SIZE/2). While you likely won't have to use these constants, familiarity with them may be useful for debugging purposes.
Traffic and Driving Rules
The basic traffic rules for this project are similar to that in real life driving. They are:
Changing the traffic direction can be done by toggling the traffic light button.
The Program
Your GUI class must implement the TrafficGuiInterface interface and your cars must run concurrently, each with its own thread. Aside from those two requirements, we leave the design of both the GUI and the Car classes up to you. To help you get started, here are a few points to highlight to head you in the right direction.
Drawing on the TrafficCanvas: All rendering components of the GUI are done for you already in the TrafficCanvas. The TrafficCanvas is simply a subclass of a JComponent, thus it can be added to a JPanel or JFrame like any other JComponent. To create a car, call the createCar method in the TrafficCanvas class. You'll need to supply the starting position, heading, and color of the car. The createCar method returns an integer id for the car, which you will use in subsequent interactions with the TrafficCanvas to move the drawing of the car on the TrafficCanvas. To update the position of a car on the canvas, call the setCarPosition method. To remove a car from the canvas, call the removeCar method.
Car initialization: To initialize a car, you need to query the TrafficCanvas (with createCar) for a car id. Then, a thread should be created to move the car, and a panel should be created to control the car. To initialize the position and moving directions of a car, use the CAR_START_POSITIONS, CAR_MOVE_DIRECTIONS, and CAR_COLORS constants in Project5Constants.
Car movement: a car iteratively moves (when the traffic rules allow) in the direction described by its movement multiplier. For each move, the car should be displaced by the speed of the car. The speed itself is determined with the accelerate button for a car, which adds the product of the car's acceleration rate and the MOVE_RATE constant. To stop the car, press the brake button which resets the speed to 0. Once you compute the new car position, call the TrafficCanvas's setCarPosition method to update the car's position on the canvas. If the updated position is outside the canvas, a CarOutOfCanavsException is thrown and the car should be terminated. If the updated position is in the intersection while the car has a red light, a CarAtRedLightException is thrown. When the light turns green, the car should be moving at its slowest speed (i.e., as if the accelerate button was pressed once). See the video for an example of the expected behavior.
Other initialization: you may start your traffic either with a horizontal green light or a vertical green light (we will play around with your program enough so that it doesn't matter), and your simulation should start with no created cars.
Starting the program: you should put your main method in a separate class called Project5. Like other GUI programs, your main method should simply instantiate the GUI, and your GUI instantiation should set up the rest of the program.
GUI Notes
GUI behavior can sometimes be difficult to understand and can be the source of may confusing bugs. Below are a list of tips and suggestions to help you debug your GUI's behavior:
Project Submission
Once you have completed your project, you should turn in all of your files using the turnin command (even those provided that you did not change, we won't know who changed them and who didn't).
First, remove all the .class files and the project jar file from your project folder:
>> pwd
/home/yourlogin/CS180/project5
>> rm *.class
Next, change your current folder to your CS180 folder and run the turnin command:
>> cd ..
>> turnin -v -c cs180=<your recitation section> -p project5 project5
If you are having trouble submitting your files, talk to your TA for help.
Grading Rubric
Grading of this project will roughly follow the guideline below (note that many parts of this project are intertwined, so it is difficult to separate out points clearly). It is subject to change depending on how we regard different aspects of the project, however, it will not change significantly.
5: coding standards (nomenclature, comments, headers, etc.)
5: program compiles
10: sincere attempt at multithreading the cars (rest of points allocated in the workings of the GUI and car classes)
50: GUI - appearance and events
30: car class and car movement