Chapter 7

Methodical Programming
This chapter's lab is somewhat different from any
of the others in that it is a review of what you've seen of Java so far.
It offers very little in the way of new language features, concentrating
instead on the details of using and defining methods. That's one reason
we entitled it "Methodical Programming"--get it? The other reason we did
so is that we wanted to devote a chapter to the programming process itself.
We wanted to make as explicit as possible some of the practices we have
been trying to convey implicitly through our sample programs and lablets
about how to specify, design, implement, and test a program from scratch.
In this sense, the chapter offers plenty of new ideas, and these are what
you're going to focus on in this lab.
 The
"exercises" that follow are also quite different from those for any of
the other chapters. First, and most obviously, there is no lablet here.
Instead of providing you with a working sample program, we give you a
vague, informal idea for a program, and leave it to you to take it from
there. Also, rather than giving you directed tasks and problems to solve,
we give you a checklist that will guide you through the process of program
creation, dishing out some relevant pieces of advice along the way.
In the process of creating your program, you will be developing the
lablet and lab exercises for this chapter.
The
"exercises" that follow are also quite different from those for any of
the other chapters. First, and most obviously, there is no lablet here.
Instead of providing you with a working sample program, we give you a
vague, informal idea for a program, and leave it to you to take it from
there. Also, rather than giving you directed tasks and problems to solve,
we give you a checklist that will guide you through the process of program
creation, dishing out some relevant pieces of advice along the way.
In the process of creating your program, you will be developing the
lablet and lab exercises for this chapter.
Lab Objectives
|
In this lab, you will: |
|
 |
Develop a detailed program
specification from an informal problem description. |
|
|
|
Design a collection of classes that
describe your program. |
|
|
|
Define the methods needed to
implement your classes. |
|
|
|
Use your programming environment
to repeatedly write, test, and revise your program. |
|
Exercises
- SPECIFICATION. We advised you
in the text to make sure you know what you're supposed
to do before beginning any programming task, and that's what we mean when
we talk about specifying a program. At this point, your "specification"
consists of the single statement: develop a 4-function calculator. Now,
it's up to you to spell out the details. You don't need a computer to do
this--you can use a paper and pencil to specify the look and operation
of your program.
Note: If you're working "smart," rather than
"hard," this design portion could very well take as long as the rest
of the steps combined. The more time you spend here, the less time
you'll waste later.
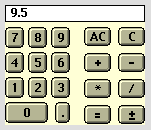
- Draw a picture of how you want your calculator to appear on the
screen. As a starting point, you might consider making it look
like this:
It's a good idea to play with a real calculator
here--you'll be surprised, we suspect, at how complicated its
action is when you take a close look.
- Let's concentrate first on the visual design, using our picture
as a guide. At first, it appears that we have a fairly complex
design--there is a display textfield at the top and no fewer
than nineteen buttons to deal with.
If
you think about grouping related items together and reusing
code, though, you might decide that there are really only ten widgets
to deal with: a NumField object for the display,
a Keypad object for the number keys, and the eight
operation buttons. In fact, since the operation buttons are all
visually related, you might even say that at the top level there
are only three objects to deal with: the Numfield,
the Keypad, and the panel that contains the operation
buttons.
- Using the specification for our ATM program in section 7.2 of the
text as a guide, describe the action of your program in terms of your
visual design. That is, describe for each part of the interface what
its role is. You'll find that you can clump some of the buttons
together in groups that are logically related. For example, all of
the keypad buttons (0 through 9, and the decimal point) cause the
display to be updated, the binary function buttons (+, -, *,
and /) all cause a new calculation to be started and any pending binary
calculation to be completed, the unary function button (±)
causes an immediate change to the display, and the = button completes
any pending binary calculation.
As with
the ATM applet, we can identify several states in our program.
To get you started, we'll provide one possible collection of states
our program might find itself in:
- START: The display contains a number or is empty (which we'll
interpret as representing zero). The number will be the operand
of a unary function or will be the first operand of a binary
function.
- BUILD: A new number is being entered from the keypad. When the
number is completed (by a click on an operator button), it will
be the operand of an operator.
- PEND: The program has just seen one of the binary operators
and won't complete the calculation until it receives an "=" command
or another binary operator.
In a program controlled by states, it's often handy to record the
states, actions, and transitions in a tabular form,
starting somewhat like this (note that we haven't included the columns
for the "C" clear and the "AC" clear all buttons).
| State \ Bttn
| Pad
| Unary
| Binary
| =
|
|---|
| START
| clear display,
set char
-->BUILD
| ???
| ???
| do nothing
-->START
|
|---|
| BUILD
| append to display
-->BUILD
| ???
| store display,
store op
-->PEND
| ???
|
|---|
| PEND
| ???
| do calculation,
update display
-->START
| ???
| do pending op,
update display,
clear op
-->START
|
|---|
- This is a good time to remember one particularly important piece
of advice we offered in the text: The longer you put off coding,
the better off you'll be in the long run. With this in mind,
return to part (b) above, and make sure you've described the operation
of your program to the extent that you can answer the following
questions about it:
- What will happen when you click on the "5" key when the
calculator's display is empty (or contains "0")? What about when
the display already contains the number "17"? What about when
it displays "24" as the result of a previous calculation (like
after hitting "6 * 4 = ")?
- What will happen when you click the "+" key? Is a calculation
performed at that point? If not, what happens? What, if anything,
needs to be saved for later?
- What will happen if the first key clicked is the "-" key?
- Will your program be able to process sequences of operations
like real calculators can? That is, what will your program do
in response to a series of operations, like "5 + 4 - 3 * 2 ="?
- Will your calculator handle a sequence like
"3 2 + 5 = 2" in a different way than "3 2 + 5 * 2"? How?
- Before moving on, you should ask yourself if you can seen how to
expand your program to accomplish any other common calculator tasks
(like a one-number memory, or built-in unary operations, such as square
root). If so, you may want to incorporate these features into your
specification now, and leave them unimplemented until you're ready to
deal with them.
- DETERMINE THE CLASSES. Your
goal in designing a program is to identify and describe the
classes you will need to accomplish its processing goals, and to have a
first crack at implementing them. With this in mind, it behooves you
to answer the following.
- What objects are suggested by the picture you developed in
Exercise 1.a? Which of these objects are obviously instances of
predefined classes and which will require you to invent classes
of your own?
- Have you seen examples of classes that are similar (or identical!)
to any of those you listed? If so, which ones? For each such class,
decide if it can be incorporated directly into your program, or if
it will have to be modified to match your program's specification.
- Can any of the widgets or classes you have identified be combined
into containers and described as new classes? For each container
you will use, describe which widgets and objects it will contain,
and which layout manager it will use.
Progress: Up to this point, you shouldn't
have touched the computer.
- Starting with your applet, implement the interface portion
(don't worry about any event handling methods--for the time being
they can just be stubs) for each of the classes you have identified.
Add them one at a time to your applet framework, compiling, debugging,
and re-compiling as you go.
Progress: The only non-stub methods you should
have at this stage are the applet's init() method
and whatever constructors your auxiliary classes require.
- Even after it compiles and produces the desired interface, it's
worth looking over your program as it now stands to consider
questions like the following. If the answer to any of them is
"No," "I don't know," or "HELP!," that is probably grounds for
reconsidering at least one of your previous responses.
- Can you name every component that your program will refer
to? In particular, write out the full name used to reference
the "3" key, the "=" key, and the number display.
- Are there any data members you need but didn't specify
earlier? For example, how to you plan to "remember" a
binary operation that has been entered but not completed?
- Are all data members properly described as either
private or public? If not, now's the
time to make sure all access is as it should be.
- Can you identify the major public methods that will be
part of each class? You should be able, at the very least, to
write stubs for these methods with appropriate signatures.
For example, write the applet's
actionPerformed()
method and have it refer to methods like handlePadClick(),
handleBinaryOp(), and handleClear().
- For each object, which other objects will it need to
communicate with? Have you considered all the methods that
will accomplish the necessary communication?
Advice: For each object, write down
what it has to do (its methods), what it has to "know" (its
instance variables) and what objects it needs to collaborate
with.
- Are there any other obvious private helper methods that
you can already see a need for? Write the code (or write stubs)
for any such methods.
Progress: At this stage, you should
have all the methods of all the classes in place, even if
they're only stubs.
- FILL IN THE METHODS. Filling
in the coding details for your classes always requires care and
thought, but it shouldn't inflict inordinate pain on the programmer if one
is systematic in going about it. Start writing your methods now, keeping
the following pieces of advice in mind.
- Keep your
Java
documentation handy at all times. You can use it to
remind yourself about syntactic details, and to find descriptions of
built-in classes and methods that will support your coding efforts.
- Write the easiest methods first. If a method turns out to be
complicated, leave it in stub form, and return to it after working
on other related methods.
Advice: It'll save you hassles later if
you get into the habit of writing comments for each class and
method at the same time as you write their code.
- If any method becomes long enough or confusing enough that it can't
easily be explained, write some private helper methods to encapsulate
some of its processing, as we suggested in step 2.e.iii for
the
actionPerformed() method.
- If a sequence of code is used in more than one place in your program,
encapsulate that code in a private helper method.
- As you define your methods, test them out immediately. Try to
identify and isolate any errors before adding too much new code to a
working program.
Progress: At this stage, you should
have a completely working program. It's probably not as tidy
as it should be, but it should be ready for thorough testing.
- CLEANUP. There are a number of
"clean up" activities that should always be
performed, even after a program runs to your satisfaction. Do each of
these now, before "releasing" your program to the public (or, your
instructor).
- Even though you have been testing your program out as you have
been writing it, it is always a good idea to have someone else run
it to see if they detect any problems. Give your program to a friend
and have them run it. Record and address any errors
that they encounter and any behavior that they find peculiar.
Advice: Don't be afraid to make major
modifications, if necessary. It's better to take the time to
do major edits than to struggle along with a patchwork quilt
of ad hoc error patches.
- Review the original specification you developed for the program
to convince yourself that the program performs "according to spec."
- Now, review the code itself with an eye towards style. If there
are any statements that are unnecessary, variables or data members
that are unused, or statement that were added for the purpose of
testing your program, remove them now. Be sure to test your program
afterwards, to make sure nothing of importance was removed by mistake.
- We told you to make note of any obvious extensions that could be
made to your program in your program specification. If any of these
seem particularly straightforward to you, implement them now. See
the Postlab Exercises below for some suggestions.
- Finally, check to see that your code is completely and clearly
documented. At the very least, every class and method should be
described to the extent that its role in the overall processing
scheme is clear. If it's not clear to you what a particular
statement or method is doing, imagine how confusing it will be
to someone else who must read your code--like your instructor!
About style: You can use any documentation
style you wish, as long as it is consistent and easy to
understand. If you don't want to invent a style of your own
just yet, consider copying the documentation style we've used
in all the lablets.
Postlab Exercises
- Add a one-number memory to your calculator, and keys that will
allow you to clear, recall, add to, and subtract from memory.
- Extend your program to be a scientific calculator. That is,
add keys for calculating a variety of unary functions. See Java's
Math class [pp. 175-177]
for some ideas about what would be easy to implement.
Last updated: December 4, 1998
Rick Decker
Department of Computer Science
Hamilton College
Clinton, NY 13323